As seen on Gaslight Hawkman and Gaslight Hawkgirl
In this tutorial I'll be walking you through how to make your own set of collapsible wings. I made mine out of brass sheeting, but there's no reason you couldn't use the same methods to create wings out of cheaper materials, such as cardboard, plastic, or anything else provided it's sturdy enough to support its own weight. So, remember, I'm listing the materials I used, but you can make modifications.
Materials
- Brass sheeting, 0.025" thick, 11 sq. ft. - Cost: $160
- 1/2" Copper tubing, 6 ft. - Cost: $15
- 6 1/2" 90-degree copper fittings - Cost: $4
- 4 1/2" T-shaped copper fittings - Cost: $5
- 4 1/2" copper end-pieces - Cost: $3
- 2 1/2" 45-degree copper fittings - Cost: $3
- 1/4"x2"x4 ft. hardwood plank, cut in half - Cost: $2.50
- Aluminum rivets
- Machine screws & bolts x10 - Cost: $5
- Clothesline - Cost: $4
- 2 Eye bolts w/ nuts - Cost: $2.50
- 2 4" hex bolts - Cost: $2
- 20 hex nuts - Cost: $3
- Fishing line - Cost: $10
- Cloth for harness, 2 yards - Cost: $25
- Buckles - Cost: $14
Tools
- Metal shears
- Portable power drill with multiple drill sizes
- Coping saw
- Sandpaper
- Tube cutter - Cost: $12
- Propane torch - Cost: $25
- Solder & flux - Cost: $25
- Wire-brush tube cleaner - Cost: $10
- Pliers
- Screwdriver
- Riveting Tool
- Leather gloves
Total Time: ~34 Hours, Total Cost: ~$260, assuming you already have the tools
(Remember, kids, the time given is non-stop, uninterrupted time. Actual real-world time was closer to a month)
Before doing anything I sketched out a bunch of different ideas for the wings. I wanted them to both look awesome and collapse down to a manageable size. Unlike the wings we made for regular Hawkman and Hawkgirl I didn't care if these were biologically accurate; the most important thing was awe-factor.
The Blades (Time: 10 hours)
 Once I had a rough idea in my head I cut out a mock-up of my wings from cardboard. It turns out brass sheeting is NOT cheap, so I wanted to make sure I ordered as little as possible. The length I decided by roughly measuring my arm length, and the main blade was made a few inches longer so there would be some extra leverage. Here you'll see all of the pieces cut out and stacked on top of one another. I had initially cut the longest blade with a flat top, but I decided it lacked flare. This is why there's the extra bit of cardboard duct-taped onto the end, there.
After all of the wing blades were cut out of cardboard I laid them out in an optimal way to see how much I could minimize material usage. Remember - measure twice! If not three times. See how small you can get the layout by flipping pieces around and reorganizing them. Think in diagonals! In the end I ordered more brass sheeting than I needed (by ~4 sq ft. for two sets of wings), but if I hadn't ordered enough I would have been screwed.
Now you need to decide what your final material is going to be. Like I said, I used brass sheeting (ordered on Amazon - they had enough that was Prime eligible, but JUST BARELY), but you could use any number of things. If you reinforced your cardboard mock-up you could even paint and use that as the real thing. Once you've ordered and received your material start laying out the cardboard blades in the same way you did when determining how much you would need. Trace your mock-up out on the real material (I used a highlighter to draw on the brass because it would rub off easily and wouldn't be glaringly obvious if I missed some) and start cutting out the pieces. If you're using brass you're going to want some sharp metal shears and a pair of heavy gloves to protect yourself from getting sliced up.
 If you're using brass you'll need to sand down the edges of the blades as you go or else your pretty wings will be weapons in their own right (and you'll potentially do some serious damage to anyone nearby - if I hadn't sanded down the edges and corners of my wings many NYCC con-goers would have left with sliced up arms from all the times they ran into the wings). I recommend sand paper made for metal. Personally I like the "brushed" look, so not only did I sand down the edges of the blades but I also used a fine-grade sandpaper in a circular motion along the faces of the blades. This also helps to clean up or hide any imperfections caused by cutting out the metal.
Once I had all of the pieces cut out and sanded I noticed something unfortunate - the main blade was simply too heavy at the end and it flopped around drastically. This would not work. I decided to reinforce the main blade, but I didn't want it to look like the miscalculation it was. My solution was to get a piece of hardwood (from Home Depot) and bolt it onto the length of the blade. I used my portable drill to drill out the holes and a bunch of machine screws, evenly spaced along the length of the hardwood, to attach the wood to the metal. It's important to note that the head of the screws faced the front so that the tail of the screws had nothing to get caught on in the back. I contemplated painting the wood, but decided that the wood looked pretty cool. I chose to put the reinforcing strips on the back of the wings so that people seeing us from the front would get a beautiful, solid-brass view of the wings and people looking from behind would get the odds-and-ends view.
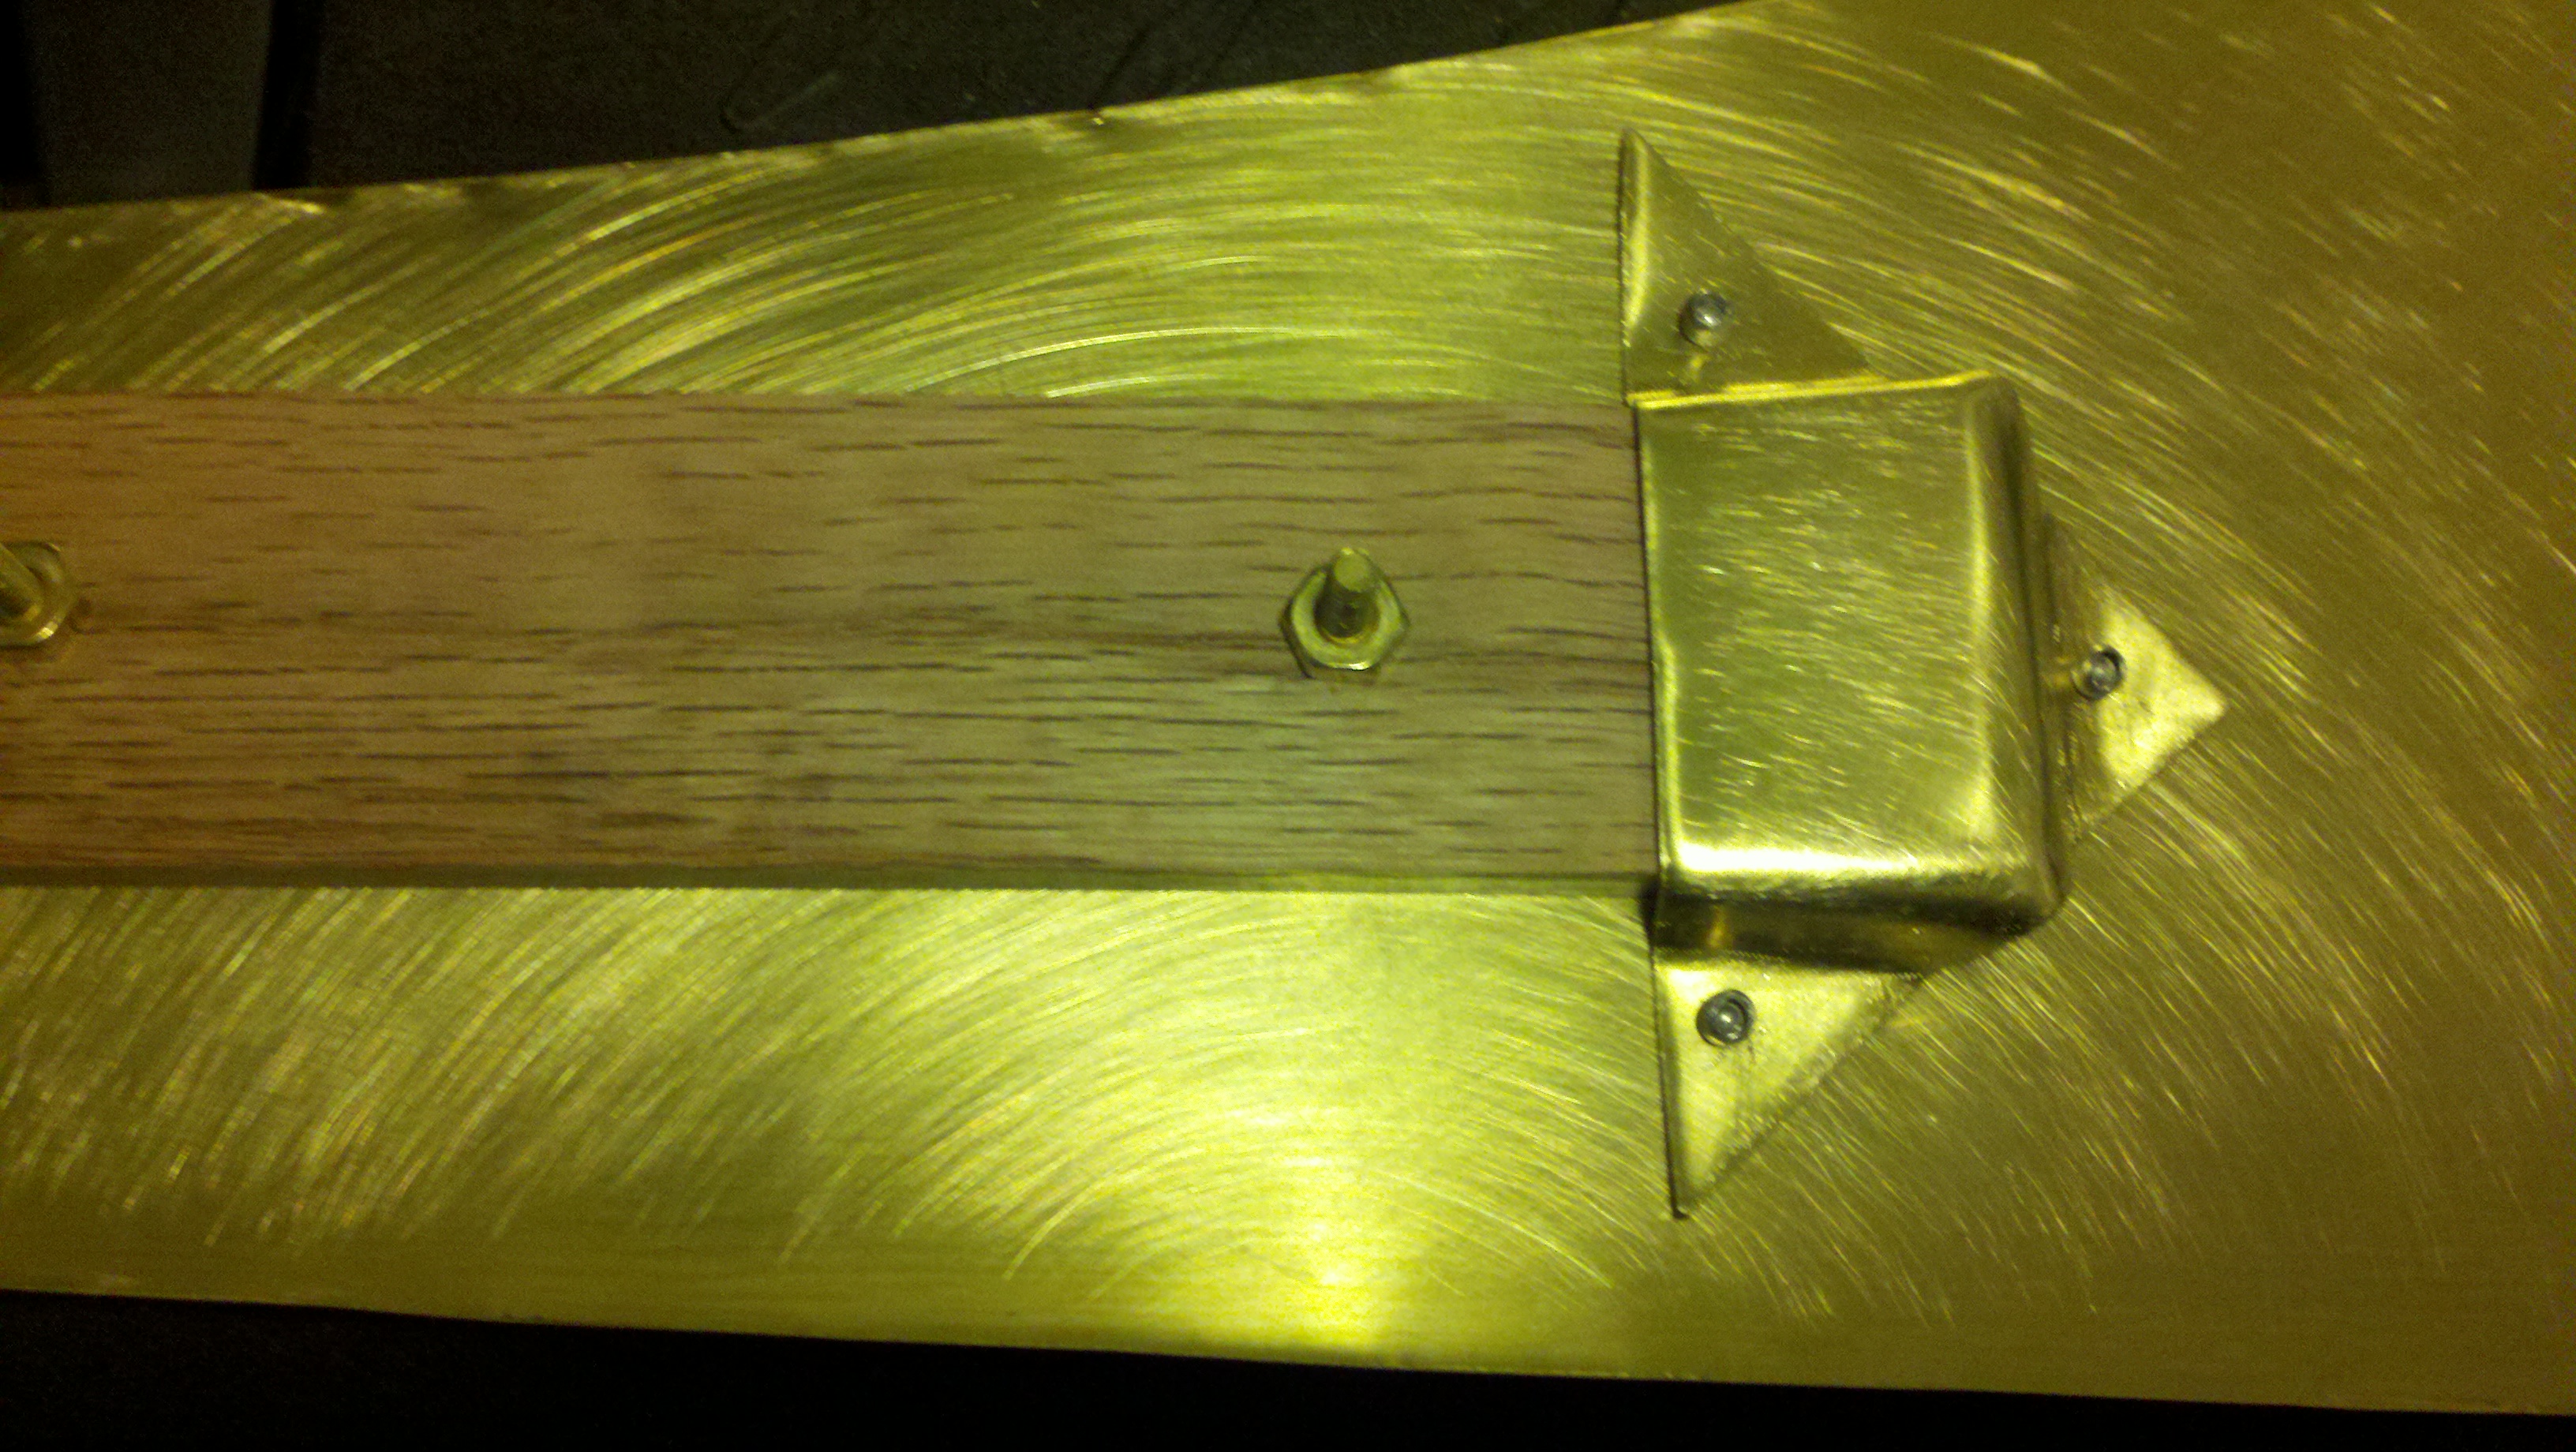 With the reinforcing strip added I still didn't love the end of the board. It didn't meet the metal cleanly and it looked sloppy. I decided to fashion an end-cap out of scrap brass. I bent it with pliers to form an indented triangle shape that would fit nicely around the end of the board then drilled out the three points and riveted it to the blade with aluminum rivets. Ideally I would have used a brass-colored rivet but my brief searches turned up nothing.
The Frame (Time: 6 hours)
I knew that the brass wings would be heavy, so I chose a sturdy material to build my frame out of: copper pipe. This is the stuff that can be found in the plumbing section of your local Home Depot. It also helps that we were going for a steampunk look, so brass and copper would compliment each other well. If you've made your wings out of a lighter material you could use PVC tubing instead of copper and save a bunch of money.
Again I sketched out ideas, but I mostly went with the same design I had used for my original Hawkman wings. I wanted my frame to hold the wings just above my shoulders and extend down the length of my back to provide solid support and reasonable distribution of weight. The width of the frame I measured from shoulder blade to shoulder blade. The harness that will later be attached to the frame should drape over your shoulders, so that's the width you want your frame to be. I bought two 90 degree copper fittings for the bottom of the frame, and two T-fittings for the mid-upper cross-brace. We'll go into more details on the cradle portion of the wings shortly.
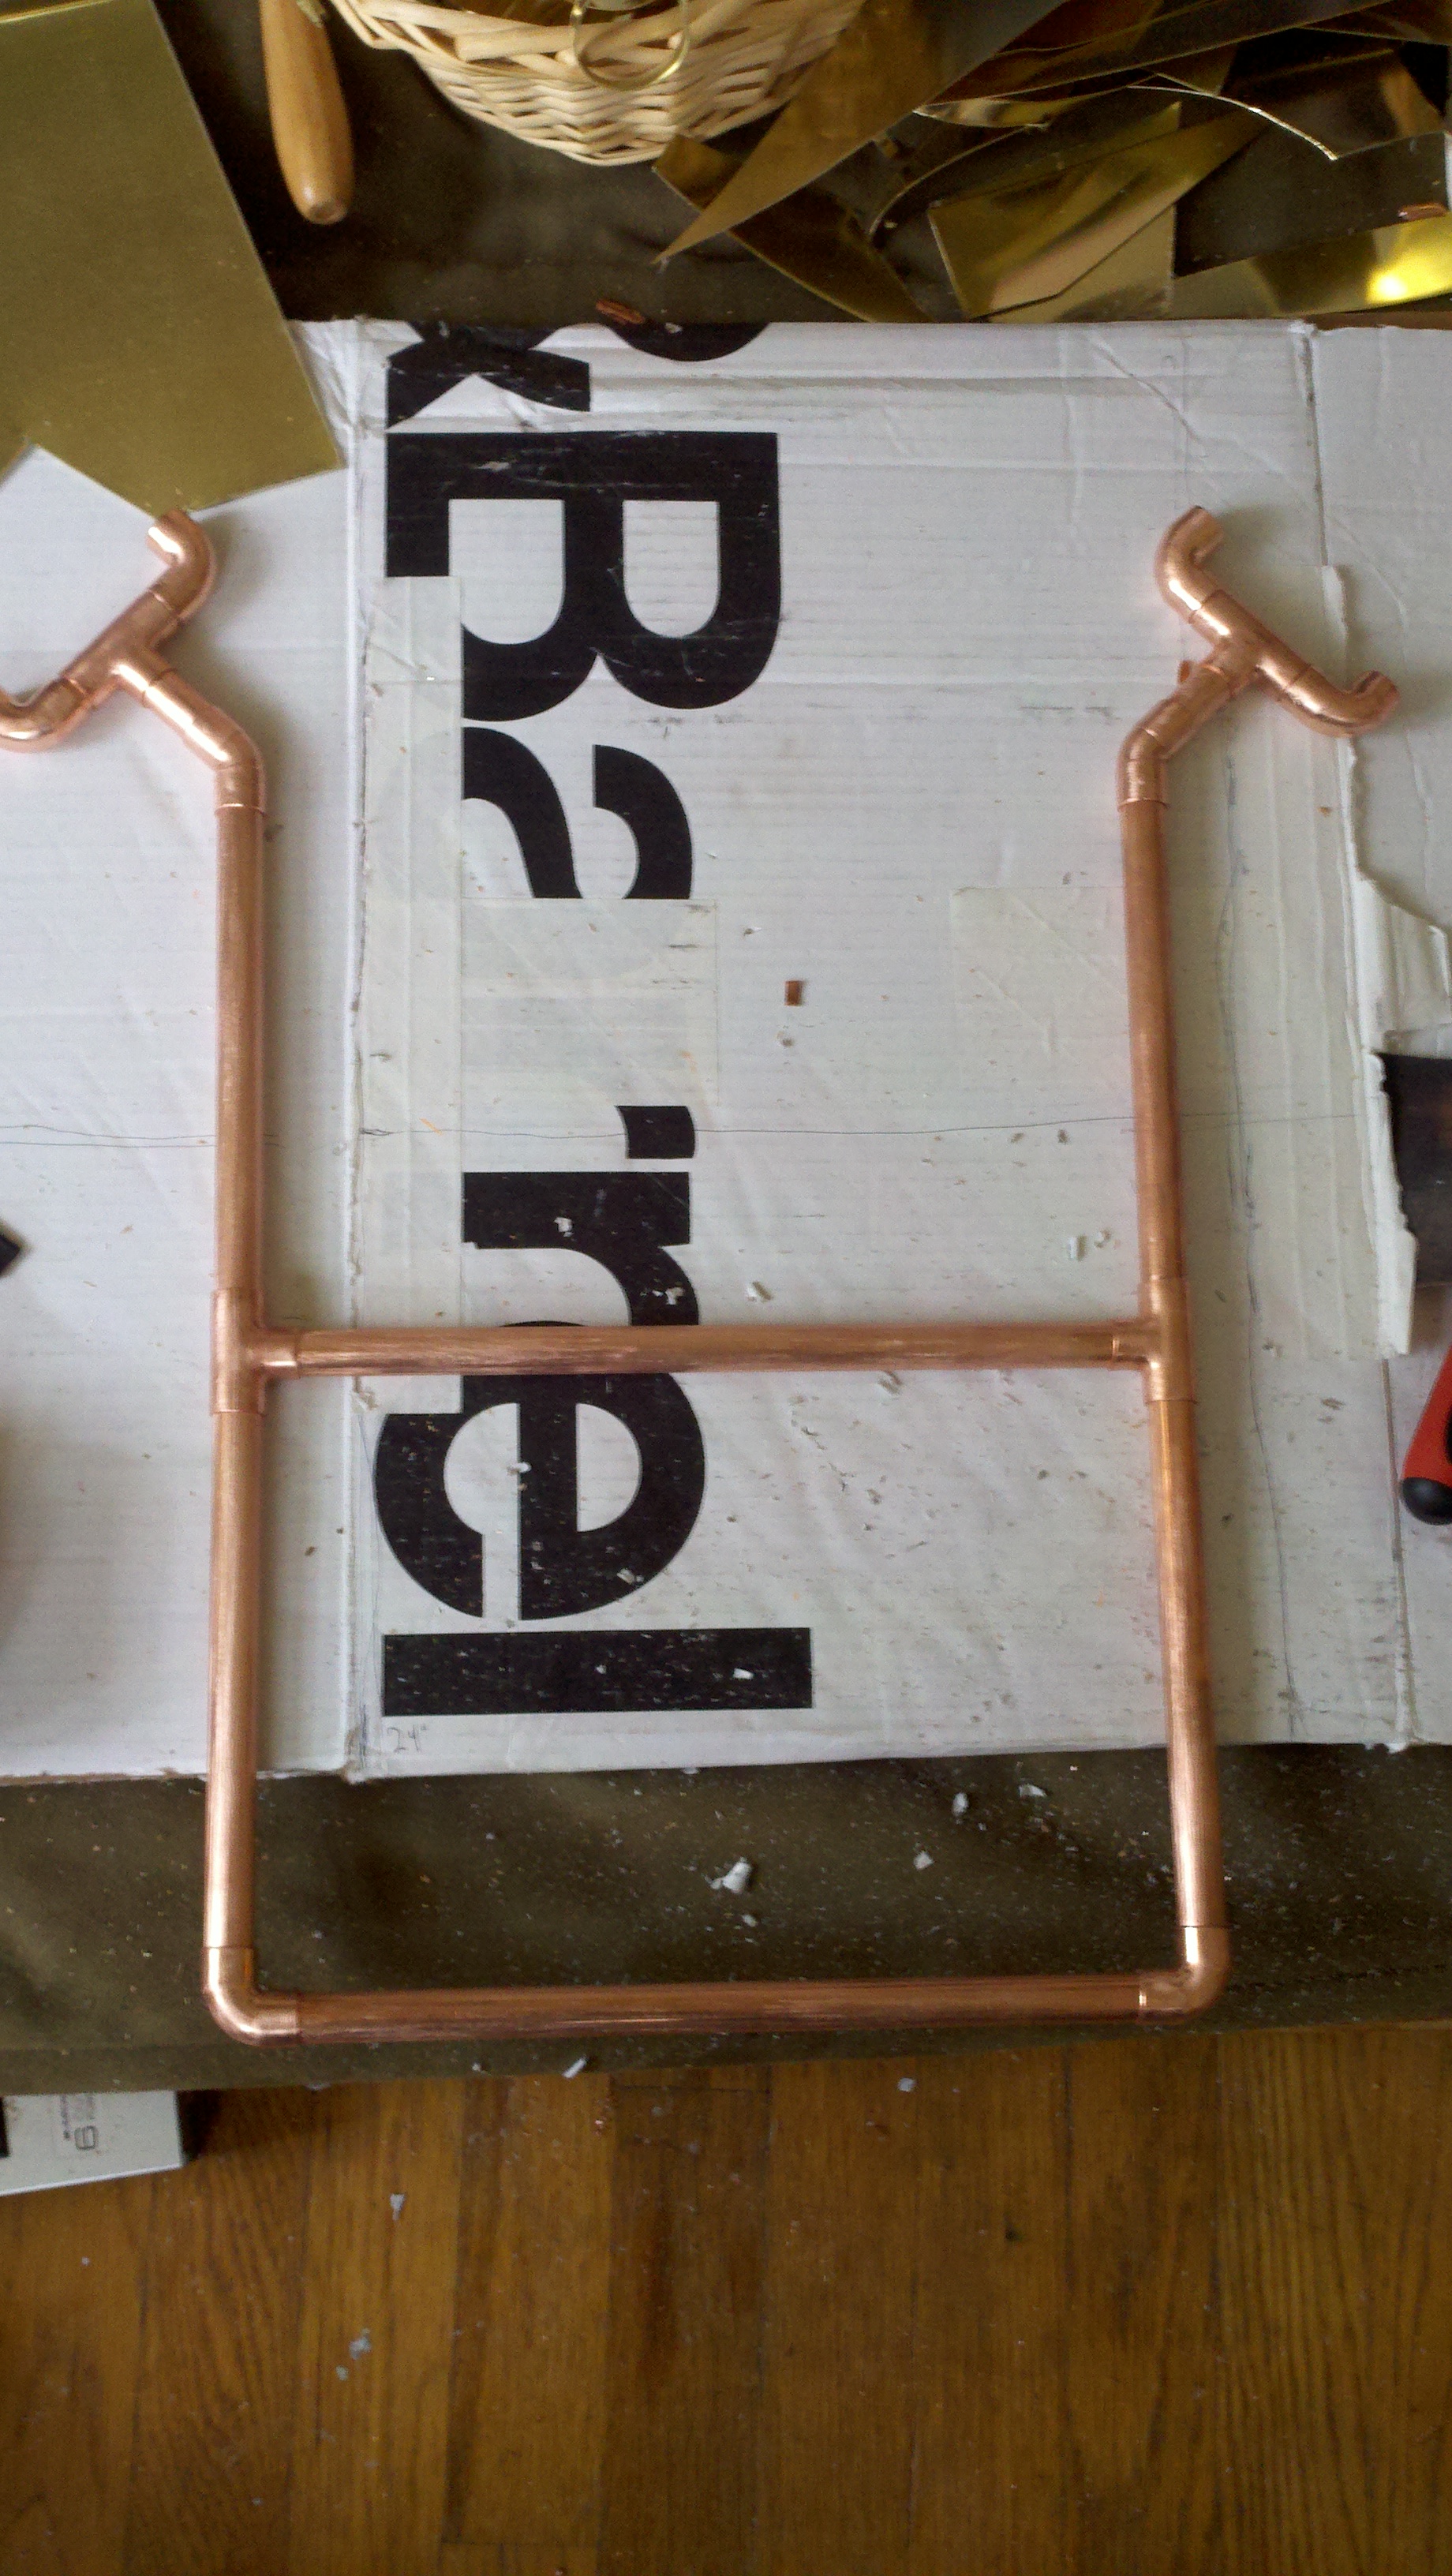 I had previously worked with copper tubing and cut it with a hack saw. It sucked. This time I actually spent the $15 to get a tube cutter. The cuts were far cleaner and it was a hundred times easier. I strongly recommend one. I measured out all of the pieces I would need and started using my tube cutting tool to bang them out. Once I had the pieces cut I laid them out to make sure it would work. I probably could have moved the cross-brace up higher, but it worked just fine.
Each wing was attached to the frame via their "cradle." The idea of the cradle is to hold the wings on a long hex bolt that then rests on the copper supports. I came up with the design on-the-fly at Home Depot while I was looking at the pieces available to me. It seemed like a great idea at the time, but as I was putting everything together I was really worried about it not holding. There are a lot of little pieces which equal a lot of points of potential failure. Thankfully my concerns were unfounded as the soldered pieces worked like a charm. I even stress tested it (putting most of my weight on the joints) and it still felt solid.
The design consists of a 45-degree fitting on the top of the frame with a variable-length straight piece coming out of this (the length should be decided by where the frame is going to sit on your back. This piece is going to give you a bit of extra height and also determine how far out to the sides your wings start). This piece then connects to a T-junction. Unlike in the picture to the left this junction should be rotated perpendicular to the frame! We want a 90-degree connector to abut the T-junction. To do that we need to cut out a short, roughly 1.25" piece of pipe to slide in between the pieces. Do that for each side and add the 90-degree connectors. Now we cut out two more lengths of pipe, each roughly 3-4" long (be sure you don't make these too short or else your blades won't fit in the cradle, but also don't make them too long or else your clearance will be hindered).
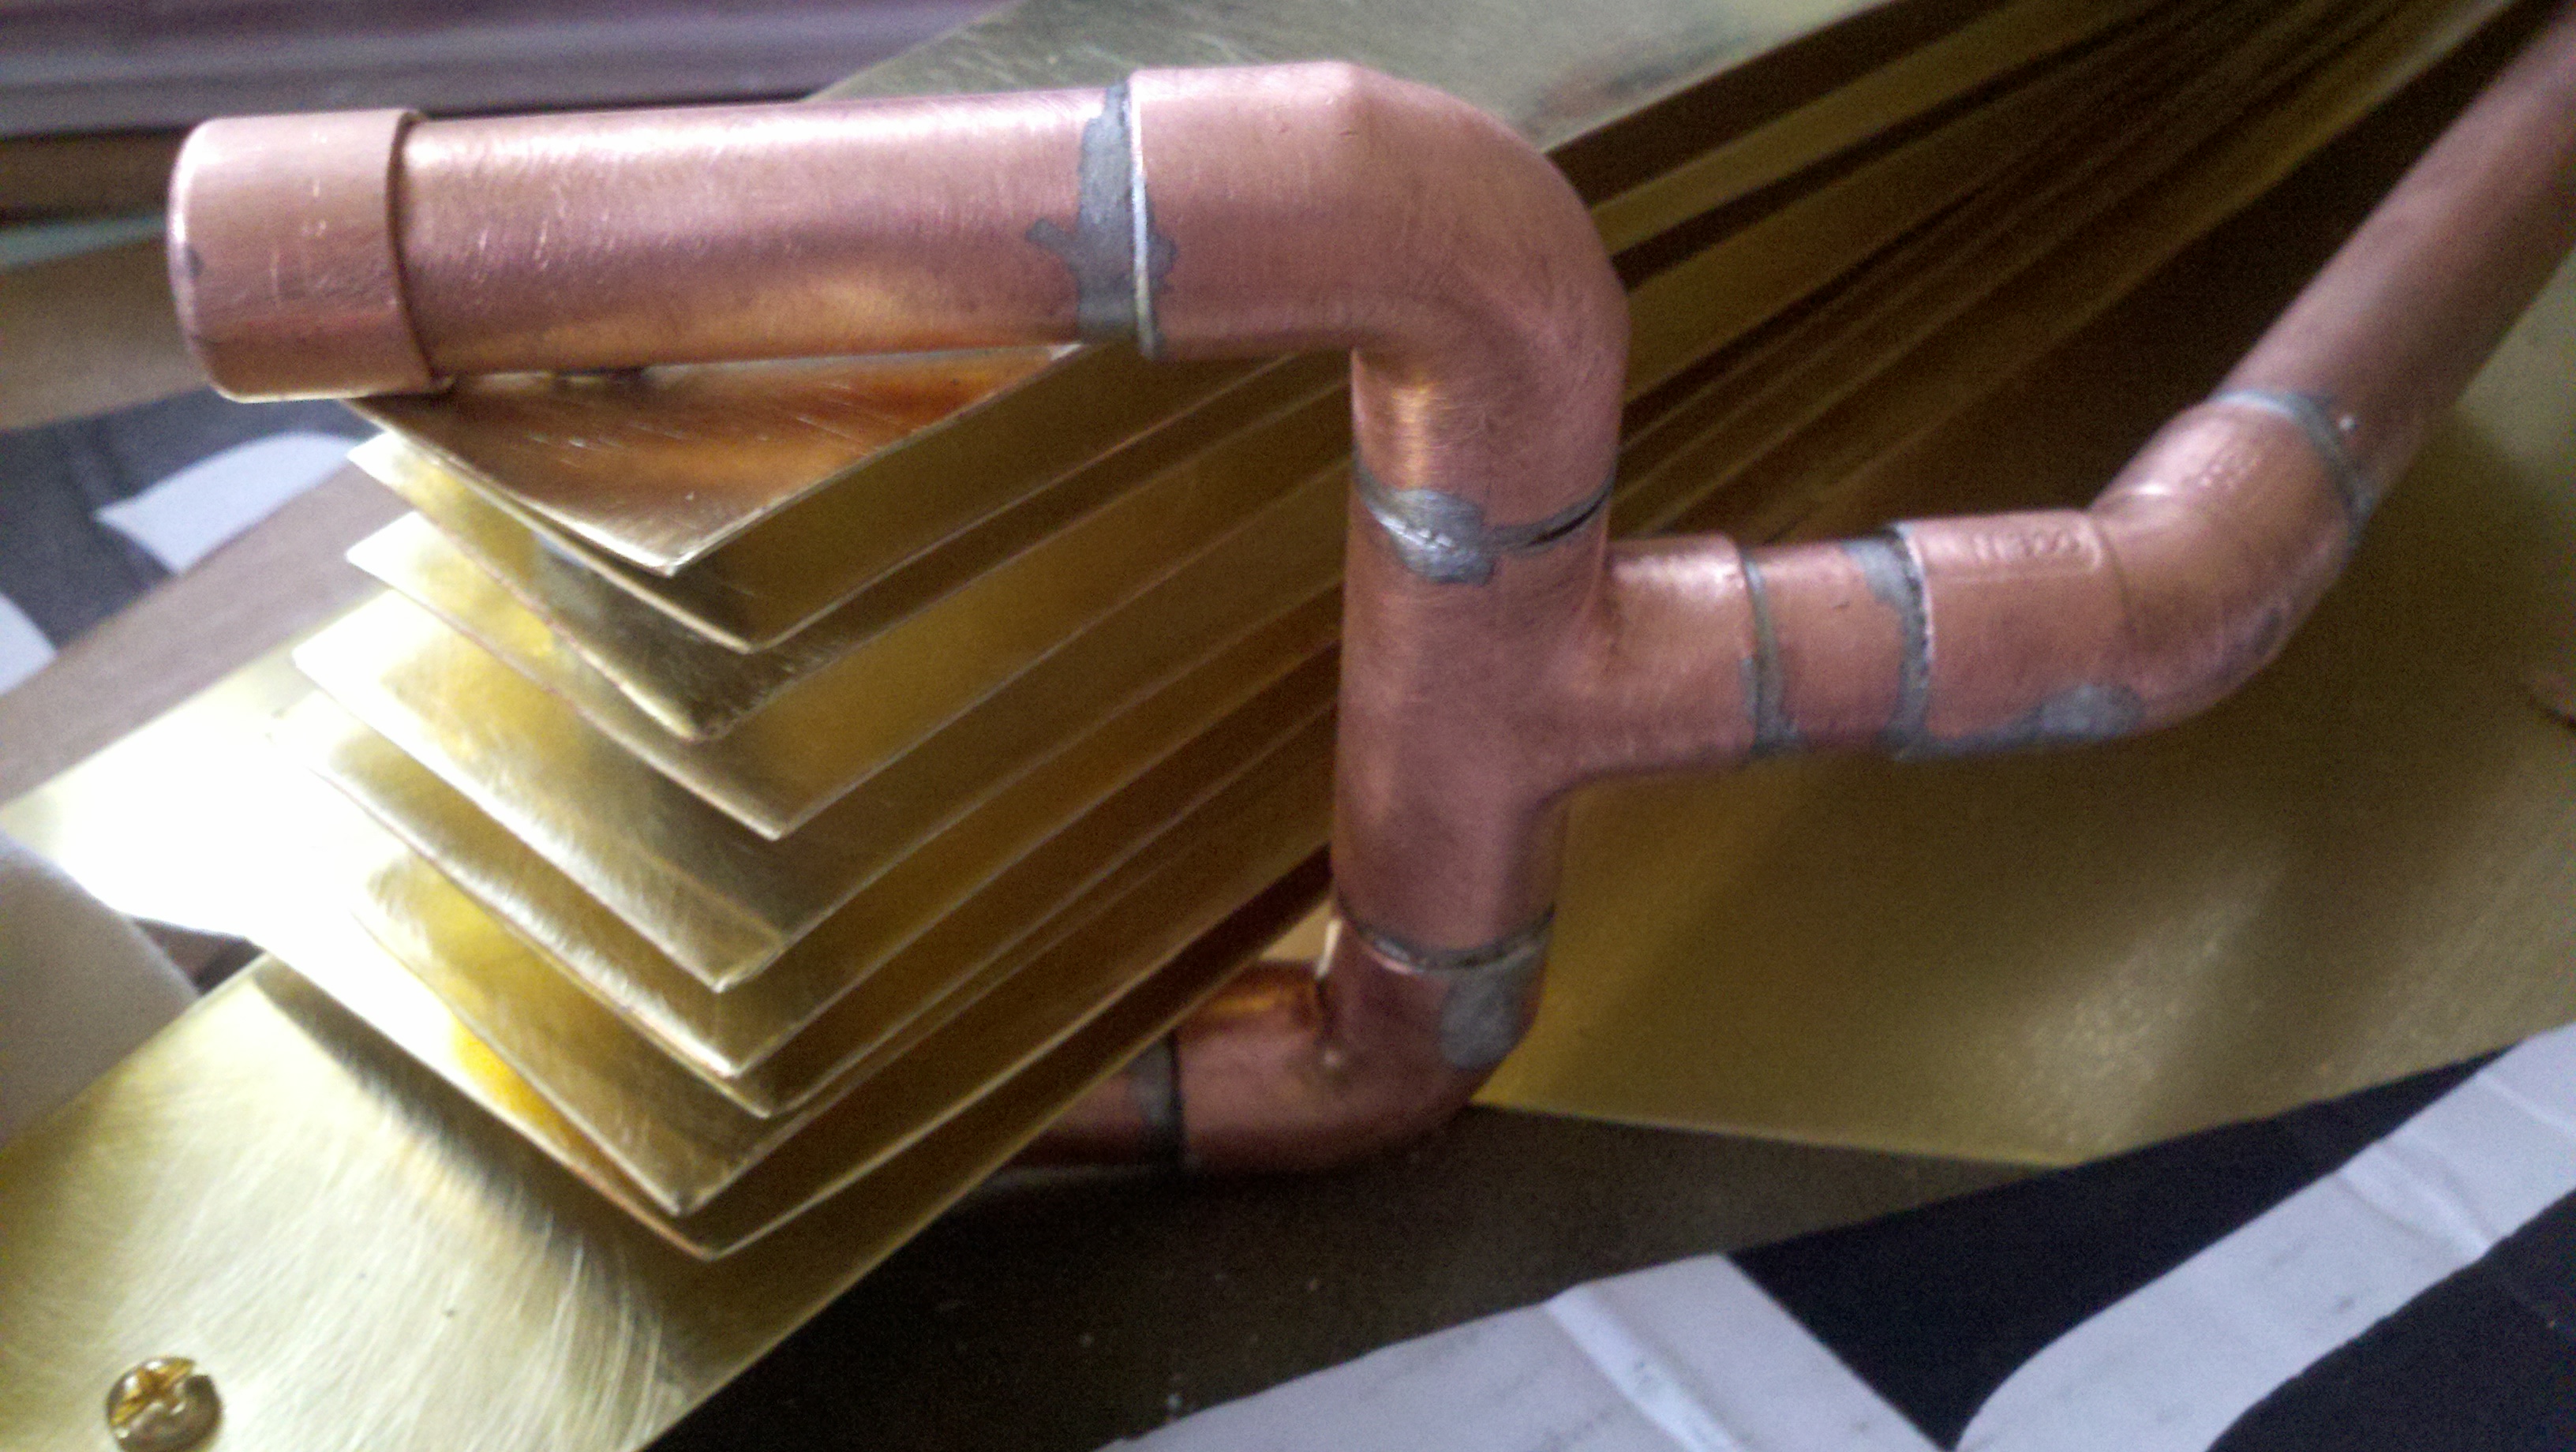
Before you solder anything be sure to drill holes in those final lengths of pipe for the hex bolt to slide inside. The holes should be drilled towards the end of the pieces, while still leaving enough space for an end-cap to fit onto the end. Personally the hex bolt I bought wasn't actually long enough to reach the full length, so only one piece of pipe had holes drilled through it and the other piece only had one hole that entered (without going through the other side). Again, this was a case of me being concerned over the structural integrity of such a layout, but it ended up working just fine. Once you have your holes drilled and have tested actually sliding a hex bolt in with the cradle all placed together (to make sure the lengths are correct) you're ready to start soldering!
I'm going to start by saying this was the first project I had ever soldered. I was extremely intimidated and was trying to come up with alternatives, but with my aforementioned fear about the stability of the cradle I knew I had to do whatever I could to make it strong. It turns out soldering really isn't hard. In fact - it's quite fun. We have a fireplace in our apartment that we don't actually use, so I set up there for working with an open flame. If you aren't fortunate enough to have a fireproof workplace then pick somewhere safe! Outside if the weather permits. I also didn't have a proper set-up for holding my pipes while I soldered them, so I ended up using frame #2 as support for frame #1 while I soldered, and then vice versa. Note: if you decided to go with PVC instead of copper pipe then you wouldn't be soldering, but instead you would use PVC cement. Just make sure you work in a well ventilated area in either case.
 The soldering itself is straight-forward: clean the fittings with your wire-brush tool, apply flux (this acts to draw in the solder), heat up the pipe and fitting with your torch, and (this is the part where you need 3 hands, or a support frame) apply the solder while still applying heat. As soon as the solder touches the sufficiently-hot pipe it should turn liquid and get pulled into the fitting. You don't need to apply too much solder. I found myself going a little overboard due to my paranoia; this wasn't hurting anything, but it was wasteful (and solder is kind of expensive), and gave it a dirty, industrial look. It kind of worked, so I wasn't too upset, but if I were to do it again I would go lighter on the solder. The most important thing you'll want to remember is to orient pieces properly before soldering. Triple check your angles and, VERY IMPORTANT, the tips of the cradle where the holes are drilled! Test with a hex bolt to make sure they are oriented correctly BEFORE soldering. I also recommend not soldering the end-caps on. I actually had a nut inside of the pipe on the end of the hex bolt to help hold it in place and I couldn't have put that on if the end-cap had already been added. You can either solder the end-cap later or do what I did: crimp the end-cap slightly with your pliers and hammer it onto the pipe. The friction is generally enough to hold it in place.
Finish up the frame by cleaning it up; odds are it's covered in grease from the soldering. I wiped mine down and went over it all again (at least all of the parts that would be exposed) with a metal brush.
Assembly (Time: 6 hours)
You now have a bunch of blades and a frame. It's time to make it come together! First you're going to need to drill holes in the blades for the hex bolt to go through. Lay out the blades in the fanned-out position so that you can get a good grasp of where you need to drill the hole. Then go through one-at-a-time and drill the holes, checking with each one that they overlap correctly. I had trouble drilling holes in the brass; I wanted to go straight to the drill bit the size of the hex bolt, but that was too big to make a dent. So I had to start with a much smaller bit and work my way up. It was a little slow going, but it worked.
 Once you have the holes drilled in all of the blades you can start adding them to the hex bolt and the frame. Slide the hex bolt most of the way into the frame, leaving just enough space at the end to slide a nut on. Start alternating blades and nuts; the nuts will act as spacers so that the blades don't get caught on one another. Be sure each blade is facing the correct direction before sliding it on. When all of the blades have been added slide the bolt into the other side of the cradle and, if possible, put a nut on it inside of the pipe. This is tricky because of the small space available - I had to use some needle nose pliers for this part. It should still hold even if you don't do this step, though, so don't worry too much.
Movement (Time: 4 hours)
There are two necessary pieces we still haven't added to make the wings expand. At this point they're just a bunch of shiny metal blades that hang down and clang loudly. To make them move we'll need to attach some fishing line and some clothesline.
We'll want to drill teeny-tiny holes at the bottom of each blade, roughly in the middle. Take your fishing line and feed it through your new hole between two blades, give yourself some excess, and cut it off. Now tie a knot in the fishing line - I used a blood knot. Continue to do this so that each blade is attached to the subsequent blade. Make sure your knots will hold! I had to re-do a lot of my knots; these things will be under a lot of load. This was, by far, the most annoying part of making these wings. My fingers were very unhappy with me.
Now that the blades are all attached you should be able to do a quick test by pulling back on the top of the main blade. This will also give you a good idea of how much force you're going to need to lift the wings. If your fishing line is properly attached then pulling on the main blade should lift the rest! Now we need to hook up the clothesline to do that for us.
 First you'll need to drill a hole big enough to feed the clothesline through at the top of the main blade. Make it as close to the top as possible without sacrificing structural integrity. You will also need to drill a hole in the frame for your eyelet. I added my eyelets to the top of the 45-degree connector piece where the cradle meets the frame. Screw in your eyelet. Attach the clothesline to the wing blade; I looped it through and tied it off with a bowline knot. Then feed it through the eyelet. From here it's going to attach to a pull strap on your harness. Ideally we would do some more work to lighten the load (rig up a pulley system within the frame?) but I didn't have the time for anything so complicated. At this point you should be able to pull on the clothesline and raise the wings!
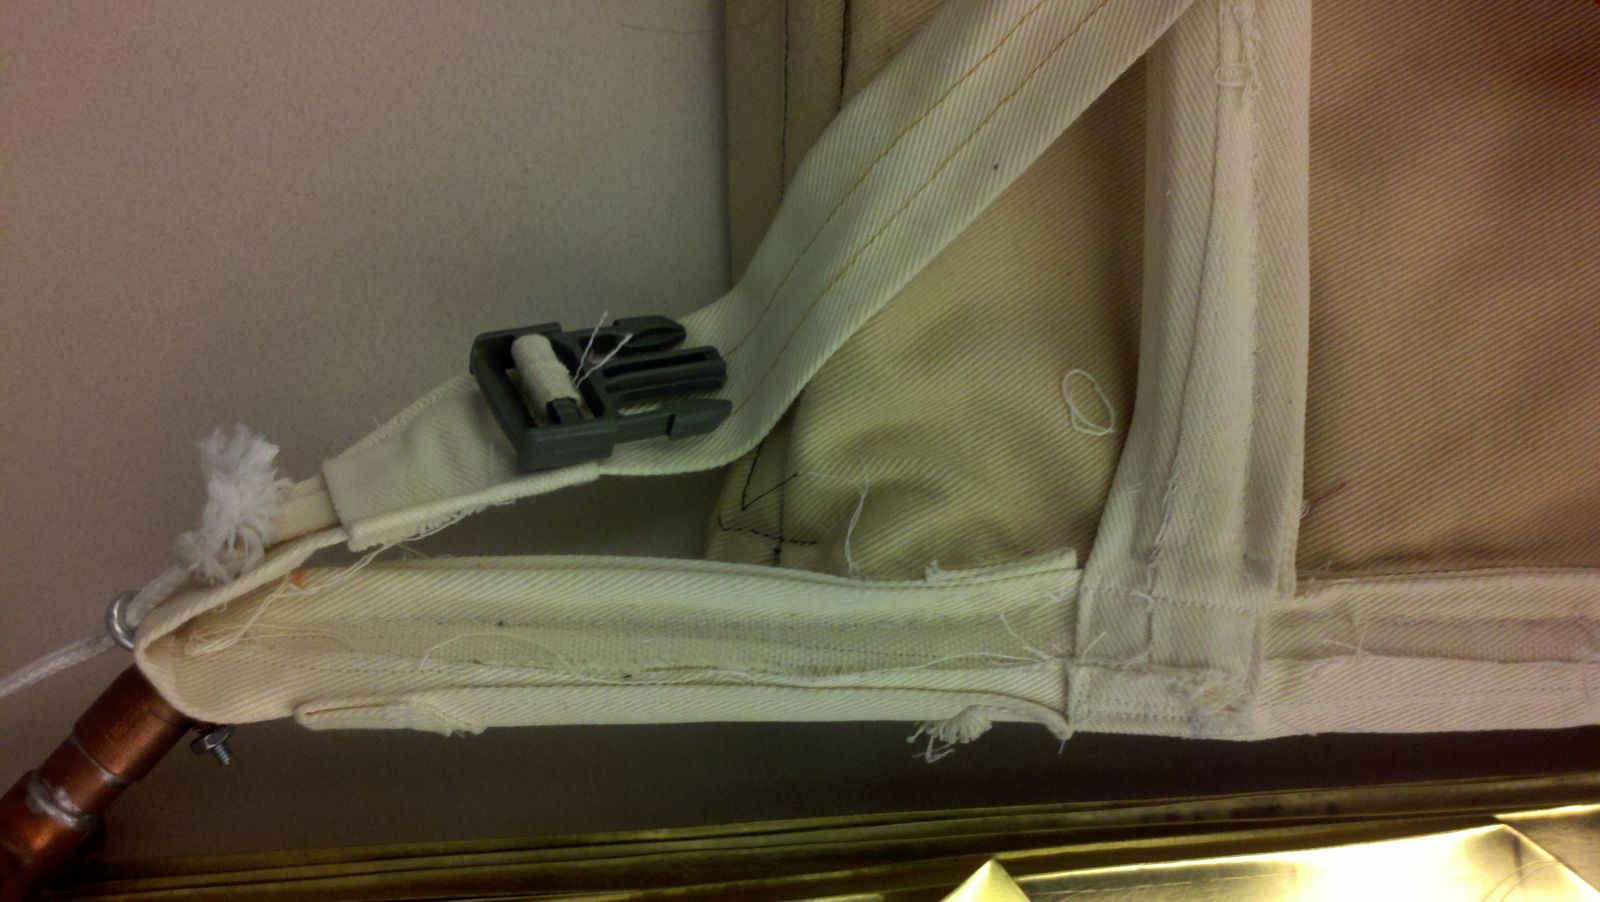
Harness (Time: 8 hours)
The only part still missing is the ability to actually wear the wings. I cut strips of a denim-style canvas fabric and sewed them double for strength. I then cut strips to go the length and width of the frame and sewed those together. Once I had strips for the frame I cut more strips to fold around the frame and sew to the harness. Since I couldn't machine sew the harness with the frame inside of it I machine-sewed everything I could FIRST then left the wrap-around pieces for last to be hand-sewed.
 The front of the harness can be any design you want. For Gaslight Hawkgirl I made a back-pack style harness, whereas for Gaslight Hawkman I made a cross-over style harness. I think the cross-over worked better at distributing the weight. I extended the straps from the top of the frame over my shoulders to meet in roughly the middle of my chest. I sewed the straps together at this point and attached a buckle. On the bottom I extended the straps from along the bottom of the frame to loop around my hips and meet near my upper abdomen. I sewed those together and attached it to the other end of the buckle. At this point I realized I couldn't actually put the thing on, so I cut the strap near my right hip and inserted another, smaller, buckle. With that I could wear the harness. Now I just needed to add the pull straps.
So that I didn't have to hold the wings up I decided to have them attached to more buckles that could be snapped in place to hold the wings up. I created a loop on the strap across each shoulder and made small straps that fed through those loops. I attached the clothesline to the small straps, and attached the male part of a buckle to the other end of the small strap. The female end I sewed onto the harness near the chest buckle. By tying the clothesline tight enough I could then pull on the small strap, raise the wing, and click it into place!
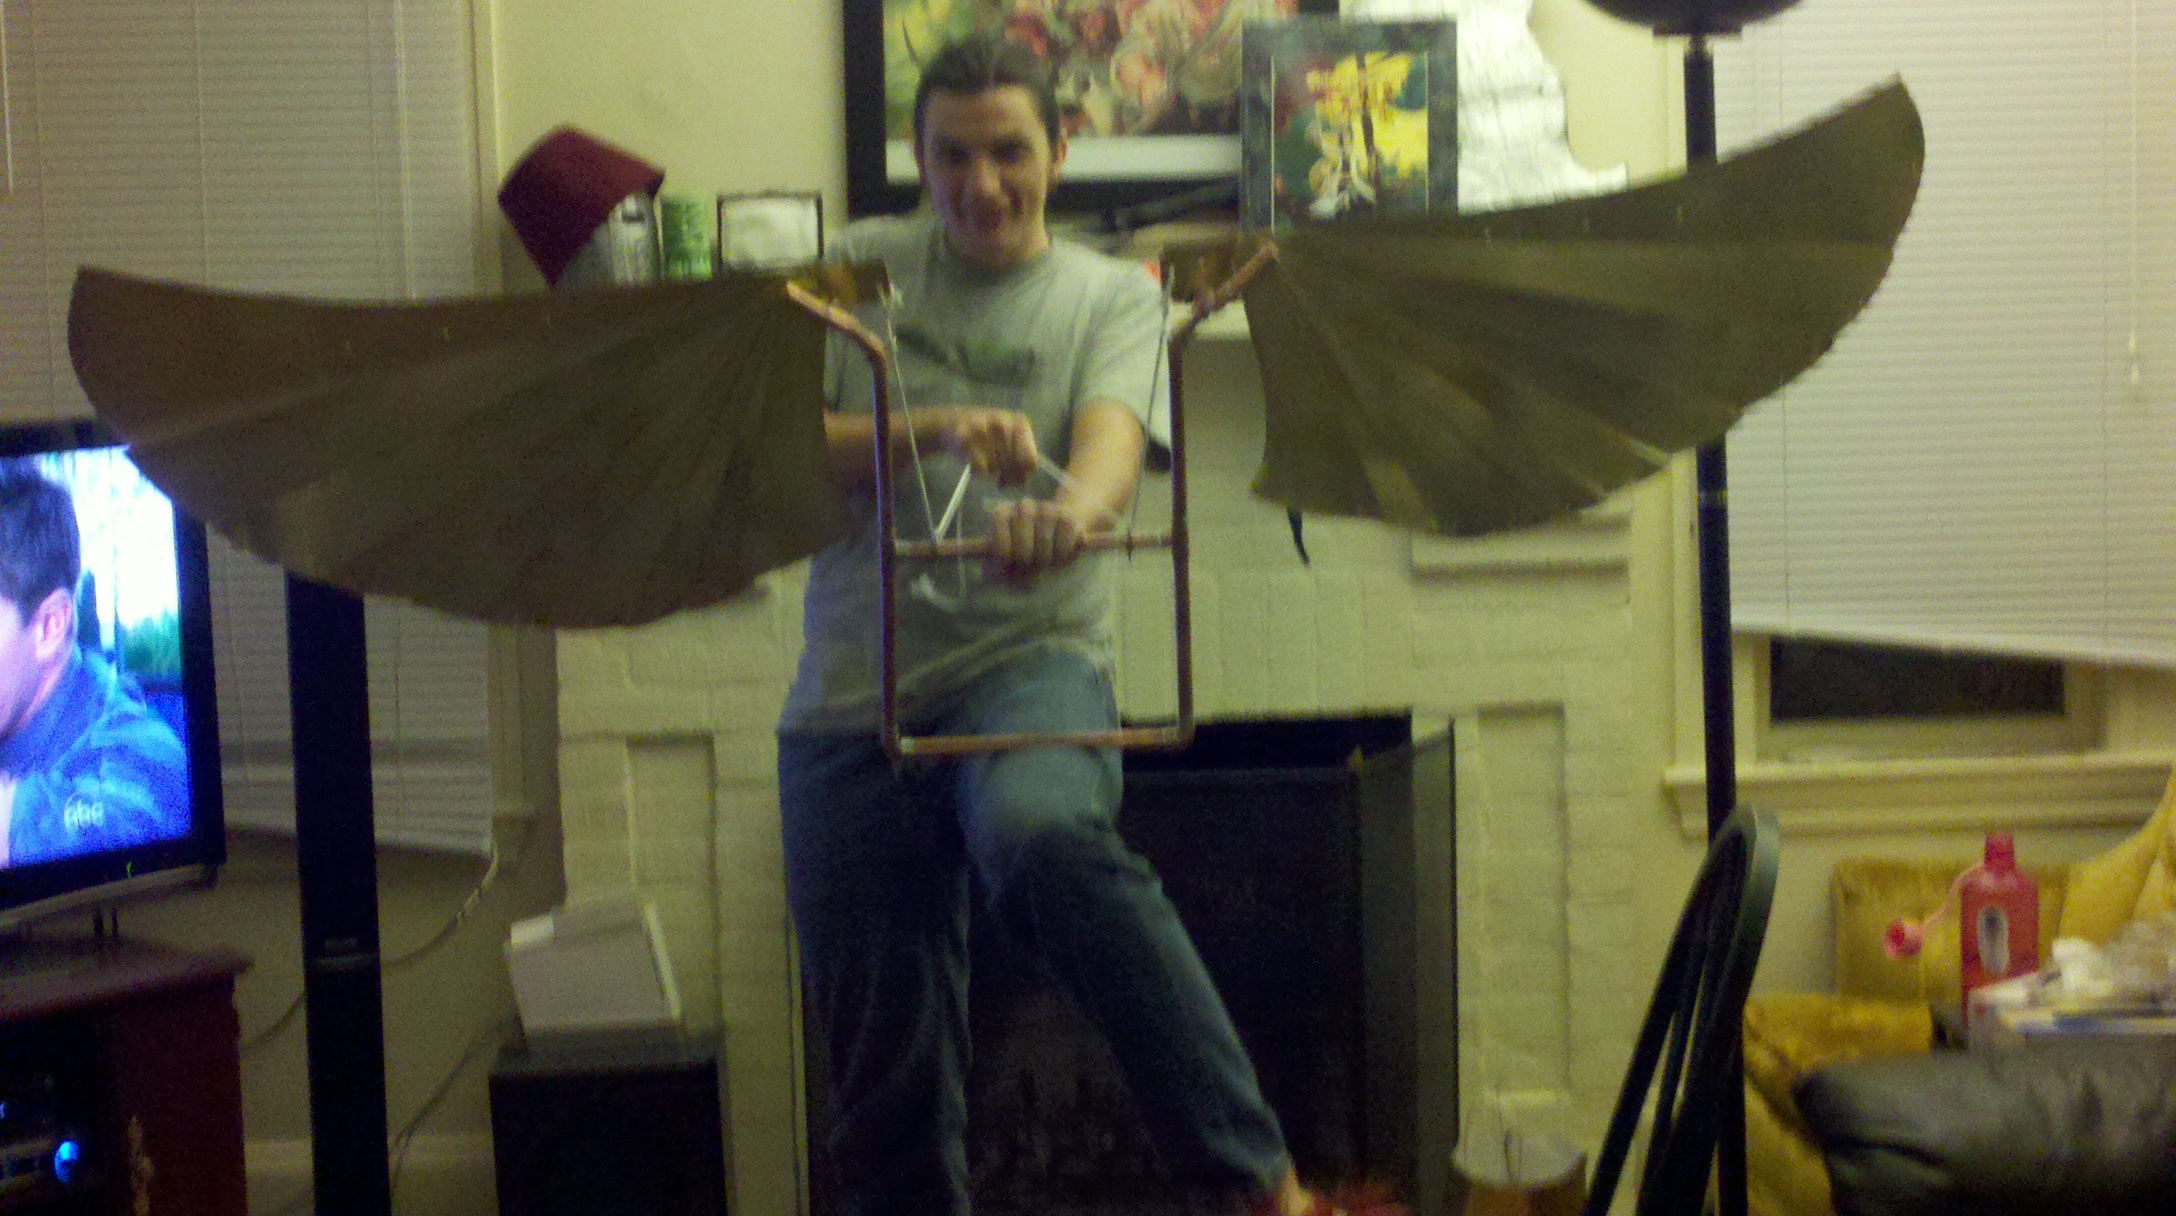
Finished Product
With all of that sewing done you should have a working set of wings! Here are a couple of pictures of them in action: